Difference between revisions of "Beam Modulation"
From PREX Wiki
Jump to navigationJump to search| Line 49: | Line 49: | ||
#*<code> cd ~/PREX/prompt/beam-mod/rootfiles_alldet_pass1 </code> | #*<code> cd ~/PREX/prompt/beam-mod/rootfiles_alldet_pass1 </code> | ||
#*<code>root -l 'dithering_plot_cyc.C(slugNo)'</code> (will fill the "dit" tree with super cycle dithering slopes for the run into the corresponding slug ) | #*<code>root -l 'dithering_plot_cyc.C(slugNo)'</code> (will fill the "dit" tree with super cycle dithering slopes for the run into the corresponding slug ) | ||
| + | *To analyze for a run with lower beam current (<60uA) | ||
| + | |||
*<span style ="color:red">To get dithering slope root file for each slug for pass2 | *<span style ="color:red">To get dithering slope root file for each slug for pass2 | ||
Revision as of 17:31, 30 August 2019
In the process of editing and updating this page. Please contact Juliette Mammei crowder@jlab.org with questions or suggestions.
PREX Main << Expert Tools
How to Run Beam Modulation
- First, make sure Coda is running
- You need to be logged in apar account on adqa3:
ssh apar@adaq3
- Go to directory:
cd /adaqfs/home/apar/vowen/BMWClient/PyGreenMonster/
- Run beam modulation code:
python3 ProductionModulation_Pause10Min.py
- Beam modulation will automatically run for 7 days
- In order to quit beam modulation
control+c
to crash out of the beam modulation program.python3 gm_bmw_clearall.py
to clean up the DAQ records and release the EPICS FFB pause states.
Modulation online plots
 Task for the analysis shift expert:
For each run,
- Check the online plot ( the top plot on the BMW plot page), we should see all 7 coils (colorful bars) at least for one super cycle (one bunch). If not, check the beam trips, if this run has a lot of beam trips, then check the other more stable runs. If you still miss one or more coils, then please call Ye: 803-553-3570.
- Check the online plot ( on the BMW Cycle page ).
- BMOD meetings
- Beam Modulation Documentation Portal
Dithering slopes extraction
- To get dithering slope root file for each slug for pass1
- Login to the apar account on aonl2:
ssh apar@aonl2 cd ~/PREX/prompt/beam-mod/scripts- If you haven't done a "gojapan" yet then
source setup_japan.tcsh
- To analyze for a slug, choose the corresponding list in
~/PREX/prompt/collector/run_list/
- Next, run
./dit_runlist_alldet.sh ~/PREX/prompt/collector/run_list/slugnumber.list - The output root files are saved in the directory: ~/PREX/prompt/beam-mod/rootfiles_alldet_pass1
- If you want to look at the dithering slopes versus super cycle plot for each slug
cd ~/PREX/prompt/beam-mod/rootfiles_alldet_pass1root -l 'dithering_plot_cyc.C(slugNo)'

- To analyze for a run, choose the corresponding run number
- Next, run
./auto-dit_alldet.sh runNo - The output root files are saved in the directory: ~/PREX/prompt/beam-mod/rootfiles_alldet_pass1
- If you want to look at the dithering slopes versus super cycle plot for each slug
cd ~/PREX/prompt/beam-mod/rootfiles_alldet_pass1root -l 'dithering_plot_cyc.C(slugNo)'(will fill the "dit" tree with super cycle dithering slopes for the run into the corresponding slug )
- To analyze for a run with lower beam current (<60uA)
- To get dithering slope root file for each slug for pass2
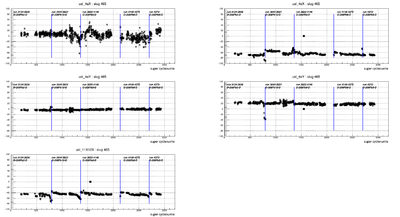
The above dithering slope plot shows that here are couple outlier points, which need to be marked as flag=0 in the sensitivity text file. And we need to generate new slope root files with the proper flag that can be saved in the directory ~/PREX/prompt/beam-mod/rootfiles_alldet_pass2.
cd ~/PREX/prompt/beam-mod/scripts/dit_11X12X_txt
 Each output txt file each row has runnumber cyclenumber flagvalue .......................
we need to change the flag value based on the above plot (0----outlier point; 1----good point)
Each output txt file each row has runnumber cyclenumber flagvalue .......................
we need to change the flag value based on the above plot (0----outlier point; 1----good point)
- After we finish this for the whole slug, then
cd ~/PREX/prompt/beam-mod/scripts - run
./dit_runlist_alldet_pass2.sh ~/PREX/prompt/collector/run_list/slugnumber.list(This step just use the modified txt file to create dithering slope root files with the right flag value for the further analysis) cd ~/PREX/prompt/beam-mod/rootfiles_alldet_pass2root -l 'dithering_plot_cyc.C(slugNo)'(run the code by plotting the slopes with flag==1 to check that if you need to do more modification)
- If some special case happened, i.e. magnets are tripped, changing the target, and DAQ issue, and those will shown in the plot as big fluctuations (which is expected), see the plots as follows
- adding all slug root files in pass2 together and run
root -l 'dithering_plot_cyc.C(slugNo)'to cross check.


- To check the singularity for dithering 5 by 5 inverse matrix
cd ~/PREX/prompt/beam-mod/scripts/dit_11X12X_txt./add_runlist_txt.sh ~/PREX/prompt/collector/run_list/slugnumber.list(generate Quartz/AT/BPMs_sensitivity_slugnumber.txt)cd ~/PREX/prompt/beam-mod/scripts/dit_11X12X_txtroot -l 'sensitivity_plot_BPMs_uptodate.C(slugNo)'(plots for a whole slug)-
root -l 'sensitivity_plot_BPMs_run.C(runNo)'(plots for a run to check the singularity after the beam tuning)- Check the top two plots of the last three canvas (c43, c44, c45), if the absolute Y mean is smaller than 0.1. We need to retune the beam to get proper dithering slopes.
- To do the dithering correction
- The pass2 root files should be used.
- Get the root files
cd ~/PREX/prompt/beam-mod/rootfiles_alldet_pass2(mark the out layer points as flag=0)