Difference between revisions of "CODA"
From PREX Wiki
Jump to navigationJump to search| Line 1: | Line 1: | ||
== Starting Parity DAQ CODA == | == Starting Parity DAQ CODA == | ||
| + | === Starting the GUI === | ||
| + | |||
[[File:DAQ_firstStart.png|thumb|600px|right|Figure 1 - Main CODA window when first started.]] | [[File:DAQ_firstStart.png|thumb|600px|right|Figure 1 - Main CODA window when first started.]] | ||
[[File:DAQ_CoolScreen.png|thumb|600px|right|Image 2]] | [[File:DAQ_CoolScreen.png|thumb|600px|right|Image 2]] | ||
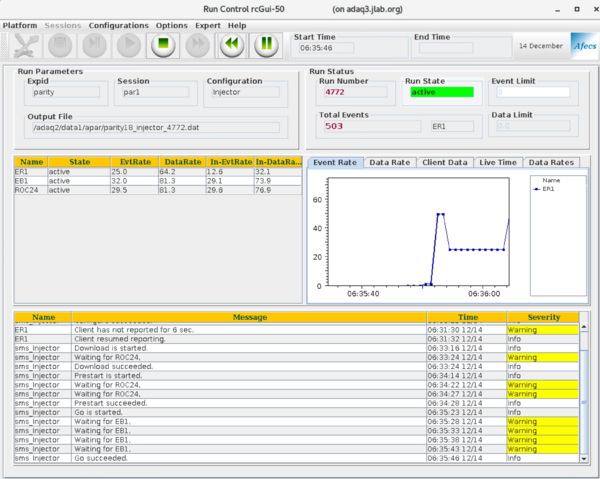
[[File:DAQ_Running.png|thumb|600px|right|Image 3]] | [[File:DAQ_Running.png|thumb|600px|right|Image 3]] | ||
* Log in as '''apar@adaq1''' | * Log in as '''apar@adaq1''' | ||
| − | * | + | * In a terminal type '''startcoda''' |
| − | * To change the configuration, choose ''' | + | ** 4 xterms will appear as well as the main CODA window (see Figure 1) |
| − | ** Select the desired configuration from the dropdown list | + | ** CODA will automatically load the last configuration used. If you are ok with this then just go to '''Platform->Connect''' |
| − | ** | + | * To change the configuration, choose '''Configurations->Cool''' |
| − | * Description of the icons in the gui (any of the Figures) | + | ** Select the desired configuration from the dropdown list (see Figure 2) |
| + | ** Production running would be ''PREX'' | ||
| + | ** Once you have loaded a configuration, the | ||
| + | |||
| + | === Starting a run === | ||
| + | |||
| + | |||
| + | === Description of the icons in the gui (any of the Figures) === | ||
** '''Configure''' (the work tool icon at the top of the window; first at the left) | ** '''Configure''' (the work tool icon at the top of the window; first at the left) | ||
** '''Download''' (second icon from the top left) | ** '''Download''' (second icon from the top left) | ||
Revision as of 12:29, 9 June 2019
Starting Parity DAQ CODA
Starting the GUI
- Log in as apar@adaq1
- In a terminal type startcoda
- 4 xterms will appear as well as the main CODA window (see Figure 1)
- CODA will automatically load the last configuration used. If you are ok with this then just go to Platform->Connect
- To change the configuration, choose Configurations->Cool
- Select the desired configuration from the dropdown list (see Figure 2)
- Production running would be PREX
- Once you have loaded a configuration, the
Starting a run
Description of the icons in the gui (any of the Figures)
- Configure (the work tool icon at the top of the window; first at the left)
- Download (second icon from the top left)
- Prestart (third icon from the top left)
- In the previous steps, warnings about waiting for a roc can be ignored if it does not take too long to respond (~10s). Do watch for Error messages. Those cannot be ignored!
- Start (4th icon from the top left)
- End (5th icon from the top left)
Instructions for shift checklist
- Latest run type (Test, Physics,..)
- Is the auto replay script running (ask the analysis expert)?
- Is the PREX run list (in a white binder) completed? (are we going to do this?)
- Please attach the left/right HV and Scalers Screenshots to the shift report
- Time of beginning of latest run (RHRS)
- Latest run number
- Dead time (%)


