Difference between revisions of "CODA"
From PREX Wiki
Jump to navigationJump to search| Line 1: | Line 1: | ||
| + | <span style="color:red">In the process of editing and updating this page. Please contact Juliette Mammei <B>[mailto:crowder@jlab.org?Subject=PREXwiki crowder@jlab.org]</B> with questions or suggestions.</span> | ||
| + | <br><br> | ||
| + | [https://prex.jlab.org/wiki/index.php/Main_Page <B>PREX Main</B>] | ||
| + | |||
== Starting Parity DAQ CODA == | == Starting Parity DAQ CODA == | ||
| − | + | [[File:DAQ_firstStart.png|thumb|600px|right|Figure 1 - Main CODA window when first started.]] | |
| − | + | [[File:DAQ_CoolScreen.png|thumb|600px|right|Image 2]] | |
| − | [[File: | + | [[File:DAQ_Running.png|thumb|600px|right|Image 3]] |
| − | [[File: | ||
| − | [[File: | ||
| − | |||
| − | |||
| − | |||
| − | |||
* Log in as '''apar@adaq1''' | * Log in as '''apar@adaq1''' | ||
| − | * | + | * On the terminal type '''startcoda''': 4 xterms will appear as well as the main CODA window (see Figure 1). CODA will automatically load the last configuration used. If you are ok with this then just go to '''Platform->Connect''' |
| − | + | * To change the configuration, choose '''Configuration->Cool''' | |
| − | + | ** Select the desired configuration. It will automatically connect the selected configuration. | |
| − | * To change the configuration, choose '' | + | ** |
| − | ** Select the desired configuration | + | * '''Configure''' (the work tool icon top left) |
| − | ** | + | * '''Download''' (second icon top left) |
| − | * | + | * '''Prestart''' (third icon): In the previous steps, warnings about waiting for a roc can be ignored if it does not take too long to respond (~10s). Do watch for Error messages. ''Those cannot be ignored!'' |
| − | + | * '''Start''' (4th icon) | |
| − | * | ||
| − | |||
| − | |||
| − | |||
| − | |||
| − | |||
| − | |||
| − | |||
| − | |||
| − | * | ||
| − | |||
| − | |||
| − | |||
| − | |||
| − | |||
| − | |||
| − | |||
| − | |||
| − | |||
| − | |||
| − | |||
| − | |||
| − | |||
| − | |||
| − | |||
| − | |||
| − | |||
| − | |||
| − | * | ||
| − | |||
| − | |||
| − | |||
| − | |||
| − | |||
| − | |||
| − | |||
| − | |||
| − | |||
| − | |||
| − | |||
| − | |||
| − | |||
| + | * '''End''' (5th icon) | ||
== Instructions for shift checklist == | == Instructions for shift checklist == | ||
Revision as of 14:30, 9 June 2019
In the process of editing and updating this page. Please contact Juliette Mammei crowder@jlab.org with questions or suggestions.
PREX Main
Starting Parity DAQ CODA
- Log in as apar@adaq1
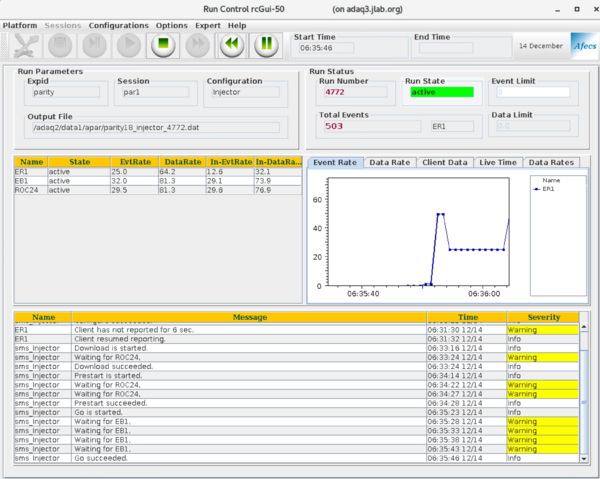
- On the terminal type startcoda: 4 xterms will appear as well as the main CODA window (see Figure 1). CODA will automatically load the last configuration used. If you are ok with this then just go to Platform->Connect
- To change the configuration, choose Configuration->Cool
- Select the desired configuration. It will automatically connect the selected configuration.
- Configure (the work tool icon top left)
- Download (second icon top left)
- Prestart (third icon): In the previous steps, warnings about waiting for a roc can be ignored if it does not take too long to respond (~10s). Do watch for Error messages. Those cannot be ignored!
- Start (4th icon)
- End (5th icon)
Instructions for shift checklist
- Latest run type (Test, Physics,..)
- Is the auto replay script running (ask the analysis expert)?
- Is the PREX run list (in a white binder) completed? (are we going to do this?)
- Please attach the left/right HV and Scalers Screenshots to the shift report
- Time of beginning of latest run (RHRS)
- Latest run number
- Dead time (%)


