Green Monster Doc
Green Monster appearance as it appeared on 2019-04-10.
Quick Links
- PyGreenMonster Github Repo
- Code repository
- TKinter Tutorial 1
- Shortest of the tutorials covering the GUI library TKinter. Includes videos if you find that more helpful.
- TKinter Tutorial 2
- A more in-depth tutorial of TKinter, covers far more than is necessary to accomplish Green Monster tasks.
- A Partial API for TKinter
- This acts as a tutorial but also the links to the TKinter classes give a list of their built-in functions and parameters, and can be a handy reference after you get the hang of the GUI programming style.
- An API of the ctypes library
- The only one I anticipate using is cdll, which pulls in functions from shared libraries.
Functionality Outline
The purpose of reworking the Green Monster is so that the GUI will not rely on the ROOT GUI libraries which are old, and difficult to extend. Also newer ROOT versions may end up deprecating or changing the functionality that the 17 year-old code relies on. This presents a challenge in that the new GUI has to interface with the legacy code in cfSockCli.c and cfSockSer.c.
The Green Monster now uses the python language GUI library TKinter, which is inbuilt into all distributions of python 3. The main file for the GUI is on adaq at /adaqfs/home/ajzec/PyGreenMonster/GreenMonster.py The python files that create the GUI are in the same directory as that file, while the C++ files providing the Green Monster's back-end are located at /adaqfs/home/ajzec/PyGreenMonster/cfSock/
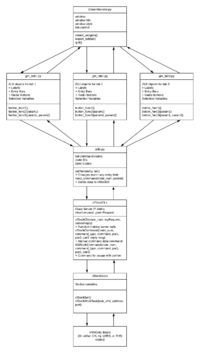
Each of the tabs in the GUI have their own python class file which acts as an interface to their own C++ class file. That C++ class file then becomes an interface to cfSockCli.c which is the legacy code that eventually attaches to the VXWorks boards in the counting house and injector crates.
The function of the Green Monster is to pass options, and variables up and down these levels.
Layer Concept
In order to keep the new Green Monster as extensible as possible, there needs to be several layers to separate the python classes from the C classes, and the server-side code. There are six in total, and the philosophy of the Green Monster design is to have as few layers passing data between each other as possible.
Layer 1: Green Monster GUI
This is the layer that contains the Green Monster class and only occupies GreenMonster.py. Here the various tabs at the top of the GM menu are created, though they aren't filled in this layer. The ability to create and quit the window is also here.
Layer 2: Tab Classes
This is the layer where most GUI development will happen, as well as the home of most of the translation of the original GUI code. The GUI is divided up into several tabs each with their own functionality. Beam Modulation is its own tab, as well as setting scan/clean data, etc. There is an "Expert" tab under which other tabs live, including tabs controlling the HAPPEX timing boards, and VQWK ADCs. Generally, any option that is intended to be changed during a run, goes into the expert tab section.
Each tabs its own python class, kept in the PyGreenMonster/tabs folder. A minimal class has a constructor, class variables for the input fields, and methods laying out the functions of the tabs. If you intend to add entry fields, radio buttons, dropdown menus, or any other widget, they should go in here.
A tutorial on how to create a new tab class is in this page below.
Layer 3: utils.py
This layer is a single file in PyGreenMonster/ called utils.py which serves two purposes:
- As a place for resources that all tab files need to access (such as, command type codes, crate IDs and global functions)
- As a place for the function
send_command()which sends a command tocfSockCli.c
This layer should require minimal editing because the test with passing information to cfSock has already been done.
Layer 4: cfSockCli.c
This file is in PyGreenMonster/cfSock/cfSockCli.c and contains the function GMSockCommand() which reads data from utils.py, puts it into a C struct and sends it to a socket server running on one of our five crates. The five crates that cfSockCli has programmed are:
- Counting House
- Injector
- Left Spectrometer
- Right Spectrometer
- Test Crate
Layer 5: cfSockSer.c
The code for this file is bundled up in PyGreenMonster/cfSock/cfSockSer.c however, the client-side of PyGreenMonster does not run it. Therefore any changes to the code won't have any effect on functionality. Unless you know how to reload the server-side file to the VXWorks boards, you shouldn't edit it. Also, compiling it requires the VXWorks compiler. However, it's included in the repository because it does contain print statements to verify that cfSockSer is running on the VXWorks side.
Layer 6: VXWorks Board
The board itself is the final layer, the one that has controls that operate the DAQ. This is the destination all settings in the Green Monster. Each tab is for a single board on one or more DAQ crates. Also, the green monster should correctly initialize by pulling the current values from these boards on startup.
Usage
The Green Monster requires python 3 to run. After navigating to the directory run it with python3 GreenMonster.py
The Green Monster is still in active development, so many functions are not implemented, and others are broken. As of 2019-04-10 the only functioning tab is the "Timeboard" tab in the "Expert" section. This section will update as development continues.

