Green Monster Doc
Back to Main Page >> Control GUIs Doc Portal
Green Monster appearance as it appeared on 2019-04-10.
Quick Links
- PyGreenMonster Github Repo
- Code repository
- TKinter Tutorial 1
- Shortest of the tutorials covering the GUI library TKinter. Includes videos if you find that more helpful.
- TKinter Tutorial 2
- A more in-depth tutorial of TKinter, covers far more than is necessary to accomplish Green Monster tasks.
- A Partial API for TKinter
- This acts as a tutorial but also the links to the TKinter classes give a list of their built-in functions and parameters, and can be a handy reference after you get the hang of the GUI programming style.
- An API of the ctypes library
- The only one I anticipate using is cdll, which pulls in functions from shared libraries.
- PEP 8 Style Guide
- Bad coding practices are exactly why we need to update the green monster in the first place. Don't make the same mistake!!! If you can adhere to PEP 8 coding conventions please do.
Functionality Outline
The purpose of reworking the Green Monster is so that the GUI will not rely on the ROOT GUI libraries which are old, and difficult to extend. Also newer ROOT versions may end up deprecating or changing the functionality that the 17 year-old code relies on. This presents a challenge in that the new GUI has to interface with the legacy code in cfSockCli.c and cfSockSer.c.
The Green Monster now uses the python language GUI library TKinter, which is inbuilt into all distributions of python 3. The main file for the GUI is on adaq at /adaqfs/home/ajzec/PyGreenMonster/GreenMonster.py The python files that create the GUI are in the same directory as that file, while the C++ files providing the Green Monster's back-end are located at /adaqfs/home/ajzec/PyGreenMonster/cfSock/
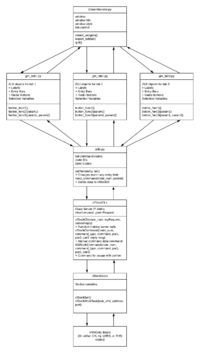
Each of the tabs in the GUI have their own python class file which acts as an interface to their own C++ class file. That C++ class file then becomes an interface to cfSockCli.c which is the legacy code that eventually attaches to the VXWorks boards in the counting house and injector crates.
The function of the Green Monster is to pass options, and variables up and down these levels.
Layer Concept
In order to keep the new Green Monster as extensible as possible, there needs to be several layers to separate the python classes from the C classes, and the server-side code. There are six in total, and the philosophy of the Green Monster design is to have as few layers passing data between each other as possible.
Layer 1: Green Monster GUI
This is the layer that contains the Green Monster class and only occupies GreenMonster.py. Here the various tabs at the top of the GM menu are created, though they aren't filled in this layer. The ability to create and quit the window is also here.
Layer 2: Tab Classes
This is the layer where most GUI development will happen, as well as the home of most of the translation of the original GUI code. The GUI is divided up into several tabs each with their own functionality. Beam Modulation is its own tab, as well as setting scan/clean data, etc. There is an "Expert" tab under which other tabs live, including tabs controlling the HAPPEX timing boards, and VQWK ADCs. Generally, any option that is intended to be changed during a run, goes into the expert tab section.
Each tabs its own python class, kept in the PyGreenMonster/tabs folder. A minimal class has a constructor, class variables for the input fields, and methods laying out the functions of the tabs. If you intend to add entry fields, radio buttons, dropdown menus, or any other widget, they should go in here.
A tutorial on how to create a new tab class is in this page below.
Layer 3: utils.py
This layer is a single file in PyGreenMonster/ called utils.py which serves two purposes:
- As a place for resources that all tab files need to access (such as, command type codes, crate IDs and global functions)
- As a place for the function
send_command()which sends a command tocfSockCli.c
This layer should require minimal editing because the test with passing information to cfSock has already been done.
Layer 4: cfSockCli.c
This file is in PyGreenMonster/cfSock/cfSockCli.c and contains the function GMSockCommand() which reads data from utils.py, puts it into a C struct and sends it to a socket server running on one of our five crates. The five crates that cfSockCli has programmed are:
- Counting House
- Injector
- Left Spectrometer
- Right Spectrometer
- Test Crate
Layer 5: cfSockSer.c
The code for this file is bundled up in PyGreenMonster/cfSock/cfSockSer.c however, the client-side of PyGreenMonster does not run it. Therefore any changes to the code won't have any effect on functionality. Unless you know how to reload the server-side file to the VXWorks boards, you shouldn't edit it. Also, compiling it requires the VXWorks compiler. However, it's included in the repository because it does contain print statements to verify that cfSockSer is running on the VXWorks side.
Layer 6: VXWorks Board
The board itself is the final layer, the one that has controls that operate the DAQ. This is the destination all settings in the Green Monster. Each tab is for a single board on one or more DAQ crates. Also, the green monster should correctly initialize by pulling the current values from these boards on startup.
Usage
The Green Monster requires python 3 to run. After navigating to the directory run it with python3 GreenMonster.py
The Green Monster is still in active development, so many functions are not implemented, and others are broken. As of 2019-04-10 the only functioning tab is the "Timeboard" tab in the "Expert" section. This section will update as development continues.
2019-05-15 UPDATE: The Timeboard tab is no longer functioning. Functionality was lost to the restructuring and needs to be restored. Right now the only functioning tab is the beam modulation tab.
Creating a New Tab
I don't anticipate the Green Monster needing many more tabs (except for maybe spectrometer interfaces) but I'm including this walkthrough to familiarize people with how the python GUI works, as well as to demonstrate the style I used in building it.
Creating a Tab Class
Hold off on editing GreenMonster.py for now, and instead create a new file in the PyGreenMonster/tabs/ folder, and call it whatever you like. I'll call my file baseball_reference_tab.py. First, import the modules you need to build a GUI (tkinter, and ttk if you're feeling fancy), and define a class. The class can be called whatever you want. I'll name mine "MLB_Ref." Make sure it inherits from tk.Frame or a similar widget so you can treat it as a tk object. Create a constructor, and also create a frame (or in this case a label frame) and place it in the window.
At this point baseball_reference_tab.py looks like this:
 import tkinter as tk
 from tkinter import ttk
 import utils as u

 class MLB_Ref(tk.Frame):
   def __init__(self, tab):
     self.mlb_frame = tk.LabelFrame(tab, text='MLB Reference', background=u.green_color)
     self.label = tk.Label(self.mlb_frame, text='Example Text', background=u.green_color)
     self.label.pack(padx=30, pady=30)
     self.mlb_frame.pack(padx=20, pady=20, anchor='w')
Just a simple class, and a constructor with no dynamic elements. This will work for now.
Adding Tab to GUI
Now go to GreenMonster.py and add import the new class, and its functionality. Add the following statement in the preamble:
import tabs.baseball_reference_tab as mlb
In the loop in the create_widgets() function that adds the tabs, look for the list called tab_titles. It is a list of tuples where the tuples contain both the name of each tab created, and the function object to be called to initialize the tab:
   def create_widgets(self):
       gui_style = ttk.Style()
       gui_style.configure('My.TButton', foreground=u.green_color)
       gui_style.configure('My.TFrame', background=u.green_color)

       tab_control = ttk.Notebook(self.win)
       tab_titles = [('BMW', bmw.BMW),                 #This one right here
                     ('ScanUtil', scan_util.ScanUtil), #
                     ('Expert', self.expert_tab)]      #
       for title, fn in tab_titles:
           tab = ttk.Frame(tab_control, width=800, height=600, style="My.TFrame")
           tab_control.add(tab, text=title)
           fn(tab)
       tab_control.grid(row=0, column=0, columnspan=2)
By adding to that, we create new tabs in the GUI. Change tab_titles to the following:
       tab_titles = [('BMW', bmw.BMW),
                     ('ScanUtil', scan_util.ScanUtil),
                     ('MLB Example', mlb.MLB_Ref),
                     ('Expert', self.expert_tab)]
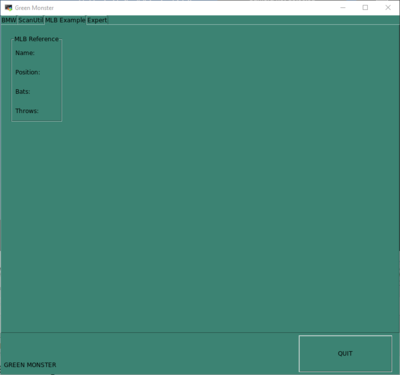
So now when looping over it, the GUI will create a new tab called "MLB Example" and populate it with what we defined in the constructor of its tab class. Run the GUI and now your tab should be displaying the TKinter objects in the MLB_Ref class:
Adding the tab under the "Expert" tab umbrella is essentially the same process, but you have to change the tab_titles variable inside the expert_tab() function instead of the one inside the create_widgets() function.
Adding Widgets to Tab
Now, let's add functionality to MLB_Ref. Let's make the GUI dynamic. First, get rid of the example label, and add four new labels that for our hypothetical baseball player. Let's say all we care about are the player's name, positions, which side they bat from, and which hand they throw with. First, define the labels for these attributes in the constructor.
 def __init__(self, tab):
   self.mlb_frame = tk.LabelFrame(tab, text='MLB Reference', background=u.green_color)
   self.name_l   = tk.Label(self.mlb_frame, text='Name:', background=u.green_color)
   self.pos_l    = tk.Label(self.mlb_frame, text='Position:', background=u.green_color)
   self.bats_l   = tk.Label(self.mlb_frame, text='Bats:', background=u.green_color)
   self.throws_l = tk.Label(self.mlb_frame, text='Throws:', background=u.green_color)
   self.mlb_frame.pack(padx=20, pady=20, anchor='w')
Note that the labels have not been placed into a grid yet, so if you were to run the GUI nothing would show up in the "MLB Example" tab.
Next, let's add an entry field for the players' name. In the same function as above add the line:
self.name_e = tk.Entry(self.mlb_frame)
For longer or shorter entry lines, tk.Entry has a "width" attribute that you can use to specify how many characters wide the entry should be.
Next, neglecting different types of pitchers, there are only nine positions a player could play at. So it would probably make sense to have a dropdown menu with these nine options. In the same function add an array of the options, a tk.StringVar to store the selection in, and then define an OptionMenu
   self.positions = ['C', '1B', '2B', '3B', 'SS', 'LF', 'CF', 'RF', 'P']
   self.pos_var = tk.StringVar()
   self.pos_var.set('C')
   self.pos_menu = tk.OptionMenu(self.mlb_frame, self.pos_var, *self.positions)
The first argument in defining any tkinter widget should be the parent widget (or frame, or window) that the current widget is inside. In this sense, tkinter design is hierarchical. In our example, the labels, entry fields, and menus defined here are parented by the label frame defined above, which is parented by the tab object, which is parented by the ttk.Notebook object which is parented by the tkinter window.
The second argument is variable the menu is tied to. whenever the selected option in the menu is changed, so too will this variable. The last argument is the list of options the menu should have.
Now for how a player bats and throws. Define the following variables in the constructor:
   self.bats_opts   = ['Left', 'Right', 'Switch']
   self.throws_opts = ['Left', 'Right']
   self.bats_var    = tk.StringVar(); self.bats_var.set(self.bats_opts[0])
   self.throws_var  = tk.StringVar(); self.throws_var.set(self.throws_opts[0])
Which we'll need to create the widgets.
Laying widgets Out in Frame
Now it's time to actually start placing our widgets into a grid, and for that I strongly recommend you create a function specifically for that. I'm going to call it frame_layout() and place all the widgets (which we defined as class variables in the constructor) into their respective frames.
The way I envision this data layout is that each data field gets its own row, and the entry options should be included in each row. For the labels invoke the following commands:
 def frame_layout(self):
   self.name_l.grid(row=0, column=0, padx=5, pady=10, sticky='W')
   self.pos_l.grid(row=1, column=0, padx=5, pady=10, sticky='W')
   self.bats_l.grid(row=2, column=0, padx=5, pady=10, sticky='W')
   self.throws_l.grid(row=3, column=0, padx=5, pady=10, sticky='W')
Add a function call self.frame_layout() to the constructor at the of the function. Running you GUI now, the frame should look like this:
The options in grid first specify the row and column that each widget should be placed in (counting from zero from the top left). padx and pady specify how much space should be added horizontally (padx) and vertically (pady). The last option is "sticky" which aligns the placement of the widget in the grid cell. It works by sending a string as if you were looking at the alignment as a compass (with North being up). So the strings, 'N', 'E', 'W', 'S', 'NE', 'NW', 'SE', 'SW' are all legal. 'C' is also legal and centers the widget.
Labels are organized on top of each other in different rows in the same column.
Now let's add the widgets to enter info. First add the entry, and menu widgets in frame_layout()
   self.name_e.grid(row=0, column=1, padx=5, pady=10, columnspan=3, sticky='W')
   self.pos_menu.grid(row=1, column=1, padx=5, pady=10, sticky='W')
Where the "columnspan" option tells the widget how many columns in the grid it should occupy on that row.
Now because there are a handful of options for how a player bats or throws, it's smart to use the tk.Radiobutton widget to define it. And luckily we have already defined those options in the constructor. Add the following loops to frame_layout():
   for index, opt in enumerate(self.bats_opts):
     b = tk.Radiobutton(self.mlb_frame, text=opt, variable=self.bats_var, value=opt, background=u.green_color)
     b.grid(row=2, column=index + 1, padx=5, pady=10, sticky='W')

   for index, opt in enumerate(self.throws_opts):
     b = tk.Radiobutton(self.mlb_frame, text=opt, variable=self.throws_var, value=opt, background=u.green_color)
     b.grid(row=3, column=index + 1, padx=5, pady=10, sticky='W')
Don't bother making the Radiobuttons into class variables, as what's important is the variables bats_var and throw_var which automatically gets updated with the values specified in the value option.
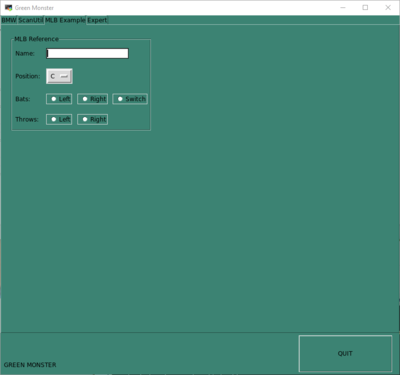
Now your GUI should look like this:
Great! We can now enter information in different ways! However, we can't do anything with the information so this GUI is basically useless. Let's add a button with a function call that makes this gui into something dynamic. Let's say we want to display information on the GUI at the click of a button.
Adding Functionality to Tab
First define a space for the information to go. Let's say we want another label frame that displays the info we put in. Start by changing the line in the constructor that place the "MLB Reference" label frame. change it to:
self.mlb_frame.grid(row=0, column=0, padx=20, pady=20, sticky='W')
Next, add a second frame called "Information." Add this to the end of the constructor:
   self.info_frame = tk.LabelFrame(tab, text='Information', background=u.green_color)
   info_text = 'Name: \nPosition: \nBats: \nThrows:'
   self.info_l   = tk.Label(self.info_frame, text=info_text, justify='left', background=u.green_color)
   self.info_l.pack(padx=10, pady=10, anchor='w')
   self.info_frame.grid(row=0, column=1, padx=20, pady=20, sticky='E')
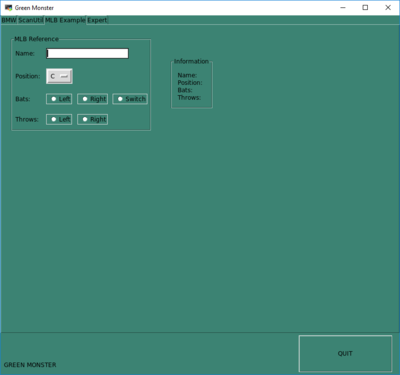
All we've done is add a frame with a label inside it. Running the GUI produces this result:
The label is defined but not dynamic.
Now define a function that would both change the label in the GUI and print information to the console. It's nice to have something to cross-check with. Create the following function and add it to the class:
 def print_info(self):
   info_str =  'Name: ' + self.name_e.get() + '\n'
   info_str += 'Position: ' + self.pos_var.get() + '\n'
   info_str += 'Bats: ' + self.bats_var.get() + '\n'
   info_str += 'Throws: ' + self.throws_var.get() + '\n'
   self.info_l['text'] = info_str

   print('Player Info from GUI:')
   print('    Name: ' + self.name_e.get())
   print('    Position: ' + self.pos_var.get())
   print('    Bats: ' + self.bats_var.get())
   print('    Throws: ' + self.throws_var.get())
The first half of this function create a string for the label, and then takes the info label (a class variable) accesses the attribute 'text' and changes it. The second half of the function is just print statements of the same info.
And finally, add a button at the bottom of the "MLB Reference" frame and link it to the function you just defined. Add the following lines to the end of the frame_layout() function:
   button = tk.Button(self.mlb_frame, text='Print out Info', background=u.green_color, command=self.print_info)
   button.grid(row=4, column=1, padx=10, pady=15, columnspan=2, sticky='W')
when creating a button the option "command" allows you to input the name of a function (or a lambda) you want to execute whenever the button is pressed. Therefore whenever the button is pressed the function replacing the label text gets called.
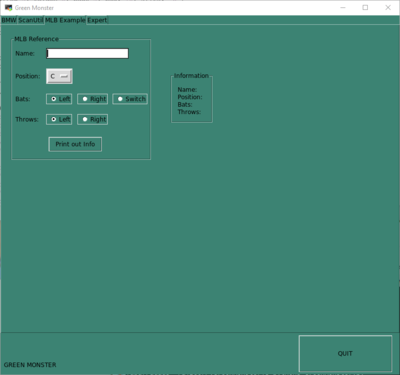
Now your GUI should look like this when run:
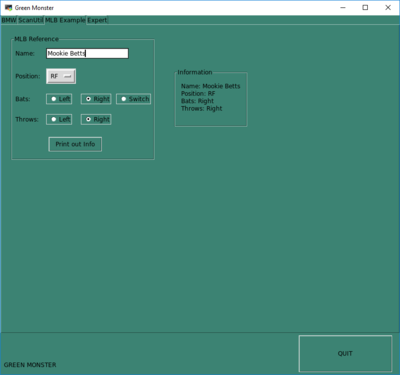
Enter some information, change up the defaults. Click the button and wouldn't you know it:
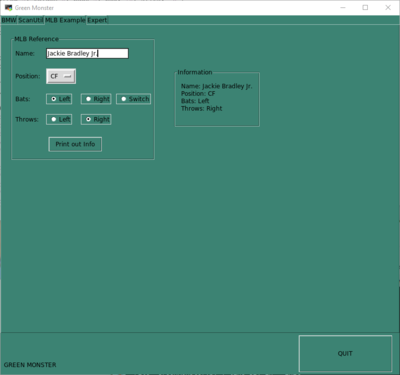
We've changed the information in the label frame on the right! And even better, enter some more information and change it again, and it still works:
Looking at the console, we can see the function call has also printed out the info we specified as well:
And there we have it. We've created a new tab, added data fields to it, and gave it some dynamic functionality.
The Tab Class in Full
Just in case you got lost in this tutorial, this is the file baseball_reference_tab.py in full:
import tkinter as tk
from tkinter import ttk
import utils as u

class MLB_Ref(tk.Frame):
  def __init__(self, tab):
    self.mlb_frame = tk.LabelFrame(tab, text='MLB Reference', background=u.green_color)

    self.name_l   = tk.Label(self.mlb_frame, text='Name:', background=u.green_color)
    self.pos_l    = tk.Label(self.mlb_frame, text='Position:', background=u.green_color)
    self.bats_l   = tk.Label(self.mlb_frame, text='Bats:', background=u.green_color)
    self.throws_l = tk.Label(self.mlb_frame, text='Throws:', background=u.green_color)

    self.name_e   = tk.Entry(self.mlb_frame)

    self.positions = ['C', '1B', '2B', '3B', 'SS', 'LF', 'CF', 'RF', 'P']
    self.pos_var = tk.StringVar()
    self.pos_var.set('C')
    self.pos_menu = tk.OptionMenu(self.mlb_frame, self.pos_var, *self.positions)

    self.bats_opts   = ['Left', 'Right', 'Switch']
    self.throws_opts = ['Left', 'Right']
    self.bats_var    = tk.StringVar(); self.bats_var.set(self.bats_opts[0])
    self.throws_var  = tk.StringVar(); self.throws_var.set(self.throws_opts[0])

    self.frame_layout()
    self.mlb_frame.grid(row=0, column=0, padx=20, pady=20, sticky='W')

    self.info_frame = tk.LabelFrame(tab, text='Information', background=u.green_color)
    info_text = 'Name: \nPosition: \nBats: \nThrows:'
    self.info_l   = tk.Label(self.info_frame, text=info_text, justify='left', background=u.green_color)
    self.info_l.pack(padx=10, pady=10, anchor='w')
    self.info_frame.grid(row=0, column=1, padx=20, pady=20, sticky='E')

  def frame_layout(self):
    self.name_l.grid(row=0, column=0, padx=5, pady=10, sticky='W')
    self.pos_l.grid(row=1, column=0, padx=5, pady=10, sticky='W')
    self.bats_l.grid(row=2, column=0, padx=5, pady=10, sticky='W')
    self.throws_l.grid(row=3, column=0, padx=5, pady=10, sticky='W')
    self.name_e.grid(row=0, column=1, padx=5, pady=10, columnspan=3, sticky='W')
    self.pos_menu.grid(row=1, column=1, padx=5, pady=10, sticky='W')

    for index, opt in enumerate(self.bats_opts):
      b = tk.Radiobutton(self.mlb_frame, text=opt, variable=self.bats_var, value=opt, background=u.green_color)
      b.grid(row=2, column=index + 1, padx=5, pady=10, sticky='W')

    for index, opt in enumerate(self.throws_opts):
      b = tk.Radiobutton(self.mlb_frame, text=opt, variable=self.throws_var, value=opt,  background=u.green_color)
      b.grid(row=3, column=index + 1, padx=5, pady=10, sticky='W')

    button = tk.Button(self.mlb_frame, text='Print out Info', background=u.green_color, command=self.print_info)
    button.grid(row=4, column=1, padx=10, pady=15, columnspan=2, sticky='W')

  def print_info(self):
    info_str =  'Name: ' + self.name_e.get() + '\n'
    info_str += 'Position: ' + self.pos_var.get() + '\n'
    info_str += 'Bats: ' + self.bats_var.get() + '\n'
    info_str += 'Throws: ' + self.throws_var.get() + '\n'
    self.info_l['text'] = info_str

    print('Player Info from GUI:')
    print('    Name: ' + self.name_e.get())
    print('    Position: ' + self.pos_var.get())
    print('    Bats: ' + self.bats_var.get())
    print('    Throws: ' + self.throws_var.get())
Afterthought
GUI programming is powerful because you can do so much with so little. All the libraries you need are defined, and a good GUI makes its core functionality obvious and is pleasing to the eye.
In specific, the class we created above is not made with the same format as most of the TKinter tutorials. Part of the reason is to preserve the level structure of the program's back-end. The other part is because of the design constraints of python. The burning question we should answer is:
Why define the widgets in one function, and lay them out in another?
Defining a class variable outside of a class' constructor is generally considered bad python practice, so I don't mix the layout and the definition if they're in other functions. You could do the layout of the widgets in the constructor, but I personally consider long functions (anything longer than the screen you're working on) to be bad practice, so I choose to separate out the two.
I wish I had a better answer to give than "aesthetics" but it's really that simple. ~AJZ
Task List
Need to Have Before PREX
- Finish tabs so that functionality of current GUI is replicated
- Fill all options from the VXWorks boards upon GUI startup
- Add tabs to control the ADCs on the left and right spectrometers
- Add an option to kill the VXWorks server if it locks up, or starts returning bad data
- In VQWK board settings, find a way to display the time per sample
- Change the units in the sampling options so that they can enter units in time, rather than number of samples.
- In the HAPPEX Timeboard change samples also to time units
- Add a screen to type in a global ramp delay and set all the VQWK and HAPPEX timeboards.
Would be Nice
- Add a makefile so people don't need to compile cfSockCli manually
- Clean up
create_widgets()so that if statements aren't necessary - Add a tab to write a new tab python script to the GUI
- Also find a way to refresh the GUI so it doesn't need to be restarted every time

